Installing Service Workers In Your Jekyll Blog
27 Nov 2018 12 mins read jekyll webRecently, I enabled service workers for my website and the experience has been great. The website now loads faster and can be treated as a true webapp. Before digging straight into what service workers are and how to install them, let us first try to understand what are Progressive Web Apps (PWA)
What are Progressive Web Apps (PWA)
The term Progressive Web App was first coined by Alex Russell and Frances Berriman. According to them and I quote “Progressive Web Apps are just websites that took all the right vitamins”. So PWA is not a new framework or technology but it is a set of rules or syntax that can help your web application function like a mobile or desktop application. The true intent behind PWA is to make it hard for users to tell whether they are running a mobile/ desktop application or a web app.
Why do we even need PWA
Many people still have the question, why do we really need PWA when we can have mobile application and web application. The reason behind PWA to be so popular these days is that they help you run your web application just like a native mobile application. This saves time, efforts and of course money! Other than this, these are the factors that PWA help improvise:
-
Responsive: PWA are responsive, so they can fit any screen or form factor
-
Network Independent: If properly configured, PWA can be loaded even in offline mode
-
Integrated User Experience: PWAs behave like native apps. They do not have a search bar like chrome nor settings tab. They even their own app screen on mobile phones (as they behave like native apps)
-
Can be used to send notifications to user: Once you PWA is installed on a device, we can use it to send user notifications so that it becomes more engaging
-
Safe: PWAs are safe as they require a SSL connectivity (mandatory)
-
Up-to-date: Even if PWAs can be used in offline mode, but still they do update themselves periodically, thanks to Servie Worker update processes
What are Service Workers?
Now that we know the concept of PWAs and their importance, let us move towards what are Service Workers. Service Worker is merely a script that runs in background when a web application is loaded. This activity is done without any user intervention. With this script you can do many many magical things. You can track network traffic, manage push notifications, save pages in cache and many more. So basically, service workers are the base for PWAs. There are certain rules that to which service worker adhere. We will see them while seeing installation steps
A Service Worker lifecycle has three steps: Registration, Installation and Activation.
-
Registration: Here, Service workers registers install. For this you can use the
register()function ofserviceWorkerto start the registration process. Registration process is to be carried out only once. You can call this function on every page if you need, but the registration process won’t repeat everytime. Service Workers are smart, and they get updated periodically without the need of installing them everytime there is a change in web application -
Installation: This is the step where the actual caching happens
-
Activation: This event is triggered when the installation step is completed
Installing Service Workers
Though I am specifically giving an example for installing service workers on jekyll blog, you can easily add the same code with some minor changes to add them to your own website.
First step while installing service workers is to create a file named sw.js in the root of your Jekyll blog.
Note: This file HAS to be in root of your website/blog or else it won’t work
Firstly, we will make a list of all the URLs that we want to cache so that we can leverage the offline mode. This can be done by adding the following lines to sw.js
var urlsToCache = [];

var CACHE_NAME = 'omkar-pathak-cache-v1';

// Cache posts
// Limits the number of posts that gets cached to 3
// Reads a piece of front-matter in each post that directs the second loop to the folder where the assets are held
{% for post in site.posts limit:3 %}
  urlsToCache.push("{{ post.url }}")
  {% for file in site.static_files %}
    {% if file.path contains post.assets %}
      urlsToCache.push("{{ file.path }}")
    {% endif %}
  {% endfor %}
{% endfor %}

// Cache pages
// Do nothing if it's either an AMP page (as these are served via Googles cache) or the blog page
// Fallback to the offline pages for these
{% for page in site.html_pages %}
  {% if page.path contains 'amp-html' or page.path contains 'blog' %}
  {% else if %}
    urlsToCache.push("{{ page.url }}")
  {% endif %}
{% endfor %}

// Cache assets
// Removed assets/posts because I only want assets from the most recent posts getting cached
{% for file in site.static_files %}
    {% if file.extname == '.js' or file.extname == '.css' or file.extname == '.jpg' or file.extname == '.png' or file.extname == '.json' %}
      urlsToCache.push("{{ file.path }}")
    {% endif %}
{% endfor %}
In the above code, we cached our static files like JS, CSS and Images, HTML pages and blog posts.
Next step is to register the service worker. Ideally, a service worker should be able to register and install itself from any page of a web application. Hence, we need this code snippet in each and every page. Jekyll blogs typically have a footer included in each and every HTML page so you can paste the following code below in footer. This will register the agent on your local machine.
// Registration of service worker
if ('serviceWorker' in navigator) {
    window.addEventListener('load', function() {
        navigator.serviceWorker.register("/sw.js").then(function(registration) {
            // Registration was successful
            console.log('ServiceWorker registration successful with scope: ', registration.scope);
        }, function(err) {
            // registration failed :(
            console.log('ServiceWorker registration failed: ', err);
        });
    });
}
else{
    console.log('Service Workers not supported');
}
Now we want our service worker to call install event. This can be done by the following code snippet:
// Installation of service worker
self.addEventListener('install', function(event) {
  // Perform install steps
  event.waitUntil(
    caches.open(CACHE_NAME)
      .then(function(cache) {
        return cache.addAll(urlsToCache);
      })
  );
});
This will install our service worker. Now, when offline we want our service worker to fetch the URLs and their contents from cache. For this, we have to do the following
self.addEventListener('fetch', event => {
  event.respondWith(
    caches.match(event.request, {ignoreSearch:true}).then(response => {
      return response || fetch(event.request);
    })
  );
});
This will install our service worker and cache all the URLs that we had added earlier.
Now our service worker is registered, installed and ready to fetch content when offline. You can check similar behaviour on my website. You are alrady accessing my website, you can go to developer options -> Applications and see a similar behaviour.
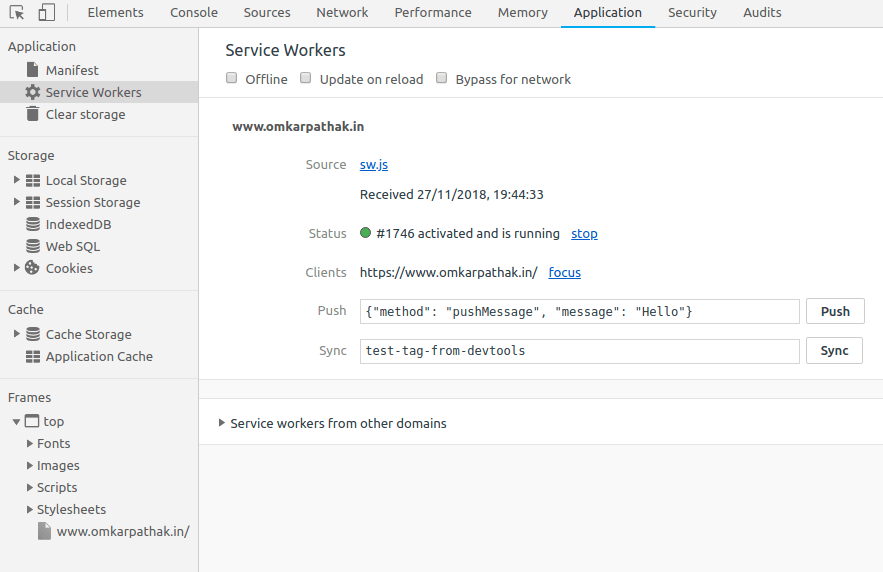
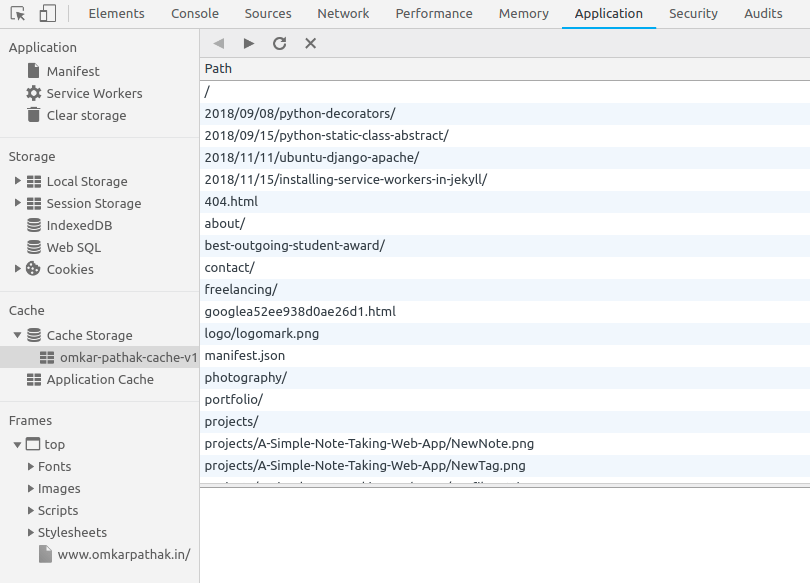
You can also see my cache URLs that will be served by service workers when your device goes offline. You can try accessing my website after disconnecting from internet, and it still works!
Requirements for PWA
Now that our service worker is installed, we need some configurations so that browsers will help us install our web application as a PWA. This configuration file is called manifest.json. Browsers search for this file by default and check for configurations. Google provides an application that creates a manifest file for you. Visit this link https://app-manifest.firebaseapp.com/ for the same.
A typical manifest.json file looks like this:
{
    "name": "Omkar Pathak",
    "short_name": "Omkar Pathak",
    "lang": "en-US",
    "start_url": "/",
    "display": "standalone",
    "theme_color": "#7a7cec",
    "background_color": "#7a7cec",
    "icons": [
      {
        "src": "icon.png",
        "type": "image/png",
        "sizes": "192x192"
      }
    ]
  }
-
name: Specifies the name for the application when you add your web application to homescreen
-
short_name: Name that will be displayed if name attribue overflows the specified length
-
start_url: Base URL of your website (tells the browser where your application should start)
- display: Any one of:
- fullscreen: Opens the web application without any browser UI and takes up the entirety of the available display area
- standalone: Opens the web app to look and feel like a standalone native app. The app runs in its own window, separate from the browser, and hides standard browser UI elements like the URL bar, etc.
- minimal-ui: Not supported by Chrome. This mode is similar to fullscreen, but provides the user with some means to access a minimal set of UI elements for controlling navigation (i.e., back, forward, reload, etc).
- browser: A standard browser experience
-
theme_color: The theme_color sets the color of the tool bar, and may be reflected in the app’s preview in task switchers
- icons: When a user adds your site to their home screen, you can define a set of icons for the browser to use
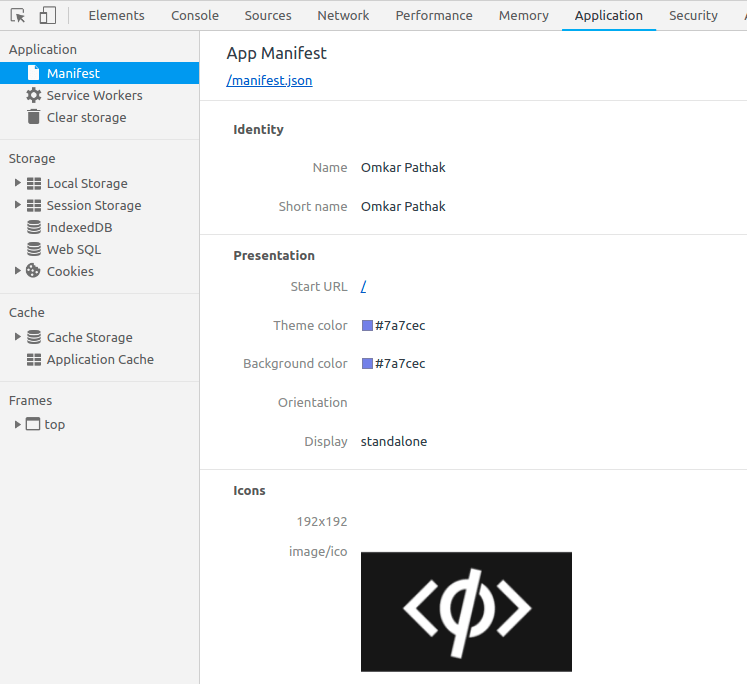
Once you add your manifest file, you can view the attributes fetched by the browser by visiting developer options -> Application -> Manifest
Results?
Once you perform all the steps above without any errors, you can add your web application to your homescreen using the Add to Homescreen option provided by browsers. Once the application is added to homescreen you can see the application name and icon that you specified in your manifest file. Notice the icon with name Omii.
![]()
On opening the application, you cannot tell the difference whether it is a web application or a mobile application

Interestingly, that application can also be viewed in Android task manager

Ain’t that fabulous? Cheers! You got your first PWA running ;)
References
Thanks to these blogs and people who helped me and inspired me to learn service workers